Ultimate Setup Guide for the VelociRAX MAX Hitch Bike Rack & Garage Mount
Congratulations on purchasing a VelociRAX MAX hitch bike rack and its garage bike rack mount. You’re gonna love it. So let’s set it up and hit the trails.
In this article, we’ll cover everything you need for assembling your vertical bike rack and how it also converts into a garage bike rack when not on your vehicle. Plan on assembly taking 30-45 minutes for your rack and the wall-mount garage bike rack.
Before You Get Started
A few things we need to go over before starting assembly:
Check Your Vehicle’s List Capacity and Hitch Rating
Just because you have a hitch mount doesn’t mean your vehicle can handle the weight. Your hitch must be a Class III 2” (50 mm). You’ll want to double-check that your vehicle can support a fully loaded MAX Rack.
Class III 2” (50 mm) Hitch with Tongue Capacity: 500 lbs / 227 kg
MAX Rack Total Bike Capacity: 300 lbs / 136 kg
MAX Capacity per Bike Slot: 100 lbs / 45 kg
For RVs and Trailers
Your hitch must be a Class III 2” hitch receiver with a 500 lb capacity at a minimum. If your RV or trailer has a bumper hitch, extension hitch, or cantilevered hitch, IT WILL NOT WORK. These hitches are inadequate. Don't use these hitches with a VelociRAX hitch bike rack.
Want some must-have accessories for your VelociRAX MAX? See what’s new and trending.
Related Link: VelociRAX MAX Bike Rack vs. OG Rack: What’s Different?
Assembling Your VelociRAX MAX Vertical Hitch Bike Rack
Tools Needed for the VelociRAX MAX Rack
Wrench or socket set:
-
24 mm (2 wrenches)
-
19 mm
-
18 mm
-
17 mm
-
13mm (2 wrenches)
1. Unpack All Components
The VelociRAX MAX Rack comes in three separate boxes, so you’ll want to make sure you have all your boxes and parts before you start assembling. Ensure all parts are included:
-
Center Post & Hitch Assembly
-
Cross bars
- Tire Baskets, Straps, & Rubber Bands
-
Garage Bracket & Hooks
-
Hardware
-
Accessories
If you are missing any parts, contact our customer support, and we’ll get the missing parts to you ASAP.
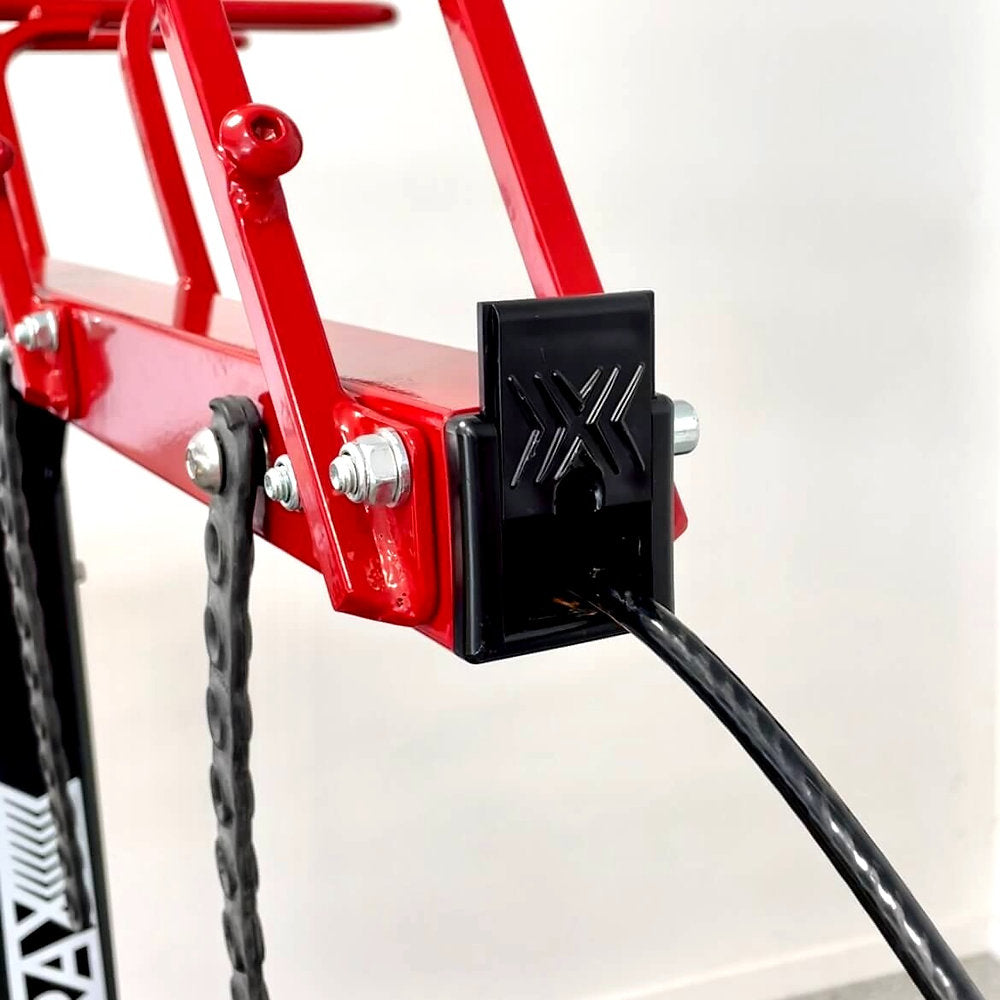
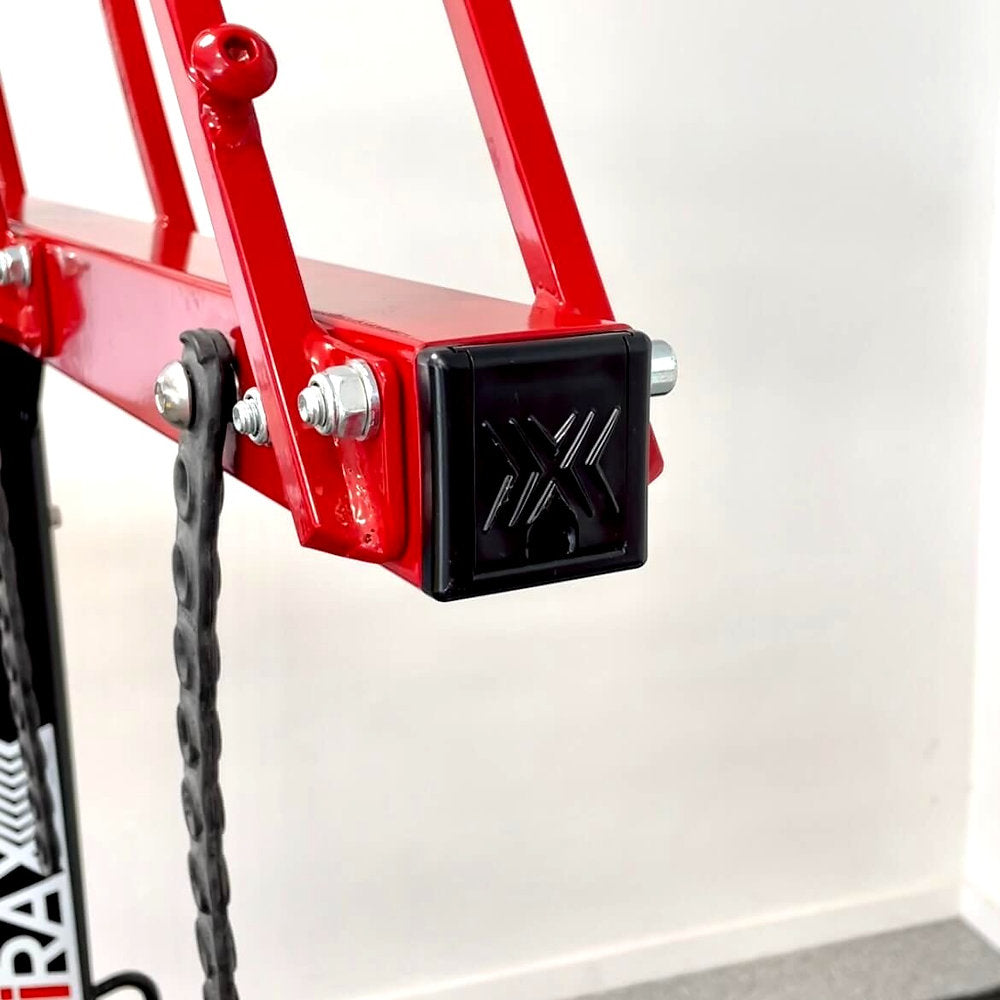
2. Insert Your Hitch Assembly into Your Vehicle.

-
Begin with the hitch assembly part, which is located in the largest box. Insert it into the hitch of your vehicle so that the pin holes line up. If the pin holes don’t line up because your hitch is too shallow, then the rack will not work with your vehicle.
-
Pull out the bag with your locking hitch pin. Ignore the center bolt in the bag for now.
-
Unlock your hitch pin using the key.
-
Slide the hitch pin through the holes in your hitch to secure the assembly to your vehicle.
-
Attach the lock with the lock face pointed out.
-
Lock the pin in place using your keys. Your keys are unique to your hitch pin. DO NOT LOSE THEM. Put the keys somewhere safe.
-
Use a 17 mm wrench to tighten the anti-rattle bolt on your hitch assembly to 25 ft lbs, or until you achieve firm tension. Then, perform a quarter-turn more.
3. Attach Your Center

-
Unwrap your center post from the packaging.
-
Grab the center bolt, washers, and nuts from the bag with your hitch pin.
-
Place one washer on the center bolt.
-
Place the center post in the hitch assembly.
-
Secure the post by threading the center bolt through the hole at the top of the hitch assembly and through the center post.
-
Attach another washer and the nut onto the center bolt. Tighten by hand until you can’t anymore.
-
Grab two 24 mm wrenches and place them on both sides of the center bolt. Use one wrench to hold the bolt in place, and the other wrench to tighten the nut.
-
Tighten the nut until you reach 45 foot lbs, ensuring there is no side-to-side wiggle between the center post and hitch assembly.
3. Attach Cross Supports and Accessories
-
The cross bars will be in your second box. Set aside the long piece of metal in the cardboard box for later. You’ll want to take out all the pieces.
-
Open your bag of bolts. There will be two smaller bags inside the wrap. Set aside the second bag full of hooks (this is for the garage mount).
Attaching the Bottom Bar

-
From your bolts bag, grab the two shorter bolts, two nuts, and four washers.
-
Add a washer to both of the bolts.
-
Place the bottom bar on your hitch assembly, lining up the mounting bracket. The tire side stops should be facing out.
-
Insert the bolts from the top of the bar through the mounting bracket on the hitch assembly on both sides.
-
Add a washer and nut to the bottom of the bolts and hand-tighten the nuts onto the bolts.
-
Grab your 19 mm and 18 mm wrenches.
-
Tighten the nuts to 7 ft lbs. DO NOT OVERTIGHTEN! This will deform the bar.
Attaching the Top Bar

-
From your bolts bag, grab the two remaining longer bolts, two nuts, and four washers.
-
Add a washer to both of the bolts.
-
Place the top bar on the top bracket of the center post, lining up your holes. The metal anchors should be facing the vehicle, and the model/serial number sticker should be facing down. The top bar SHOULD BE LONGER on the left-hand side and shorter on the right-hand side of the center post.
-
Insert the bolts from the front of the center post mounting brackets through the top bar on both sides.
-
Add a washer and nut to the bottom of the bolts and hand-tighten the nuts onto the bolts.
-
Grab your 19 mm and 18 mm wrenches.
-
Tighten the nuts to 16-18 ft lbs. DO NOT OVERTIGHTEN! This will deform the bar.
4. Attach Tire Baskets and Straps

-
Your tire baskets and straps will be in your third box. Unwrap them one at a time to attach them. Remove the bolts bag from the bag that has the tire straps. Put a washer onto each bolt now to save time while you're adding your baskets.
-
Starting on the left-hand side of your top bar, place the first tire basket onto the top bar so that the basket slants to the right.
-
Align the mounting holes.
-
Insert two bolts into the mounting holes from the back side of the vehicle so that the threads are facing out.
-
Place a washer and a nut on the end of each bolt, tightening by hand until fully secured.
-
Use two 13 mm wrenches to tighten each bolt to no more than 6 ft-lb or until the basket has no wiggle. DO NOT OVERTIGHTEN! This will deform the bar.
-
Repeat these steps for all remaining tire baskets.
Need fat tire or small tire baskets? We got them here.
Attaching the Bike Straps

-
For the bottom bar, take one strap and press one end firmly against the anchor bolt on the top side of the bar (not above the tire stop), stretching the hole over the anchor bolt until the strap firmly attaches.
-
For the top bar, take one strap and press one end firmly against the anchor bolt on the back side of the bar (facing the vehicle), stretching the hole on the strap over the anchor bolt until the strap firmly attaches.
-
Repeat for each remaining anchor on both the bottom and top bars until no straps remain.
5. Activate Hydraulic Dampers
On your hinge assembly, you need to activate the hydraulic hinge dampers before your rack can lower safely to load bikes. To do this:
-
Remove the hinge stop pin and pull the damper pin so that they can hang free.
-
Rotate the damper bracket and compress it into place between the tabs, ensuring it’s flush with the center post.
-
Reinsert the damper pin all the way.
-
Insert the hinge stop pin into one of the two slots, depending on how far you want the rack to lower, and engage the pin lock:

NOTE: Hinging the rack is not required, but it eases loading, gives access for strapping tires, and allows rear lift gate access. A quick pull on the top bar toward the vehicle will allow the lever to release easily when lowering bikes.
6. Secure the Structure of Your MAX Rack
-
Double-check all screws and bolts to ensure the assembly is stable and secure.
-
Do not use it without a properly installed hitch pin and secured anti-rattle wedge.
-
Make adjustments if necessary to ensure the rack is level and properly aligned.
-
The rack is now fully assembled and ready. Test it by pulling the release lever, tugging at the baskets (since no bikes are loaded) to help the rack come down, and test the dampers.
-
If everything looks good, push the rack upright to automatically lock it back into place.
Note: The only items left in your boxes should be the brake bands, which you'll use later to engage bike brakes on the rack to reduce motion.
Still need help and prefer an instruction manual? You can follow the assembly instructions from our VelociRAX MAX Rack Assembly PDF.
Watch Our VelociRAX MAX Rack Assembly Video
More of a visual learner? Follow along with our MAX Rack Assembly Video:
Before You Drive with a MAX Rack Installed
Here are just a few things you need to be vigilant about before your drive with your MAX Rack on your vehicle:
-
Place the Stop Pin in your preferred position while transporting bikes.
-
Do not hinge a loaded VelociRAX MAX hitch bike rack without hinge dampers engaged.
-
Do not drive your vehicle while the MAX Rack is in the hinged (loading) position.
-
Do not take your vehicle through an automatic car wash with the bike rack on the vehicle. This will destroy your rack, your car, and possibly the car wash. Just say’n.
-
Double-check that your front and back bike tires are secured tightly with the straps before driving.
-
Know your vehicle’s loaded bike height before you drive into a parking garage or your own garage. The front bike tires extend above many vehicles. You don’t want to be that guy.
Now that your rack is installed, you’re probably wishing you had gotten our new Rack Roller Mini. Check out how convenient that Rack Roller Mini makes transporting your rack.
Related Link: Five Pro Tips for Spring Bike Rack Maintenance on Your VelociRAX
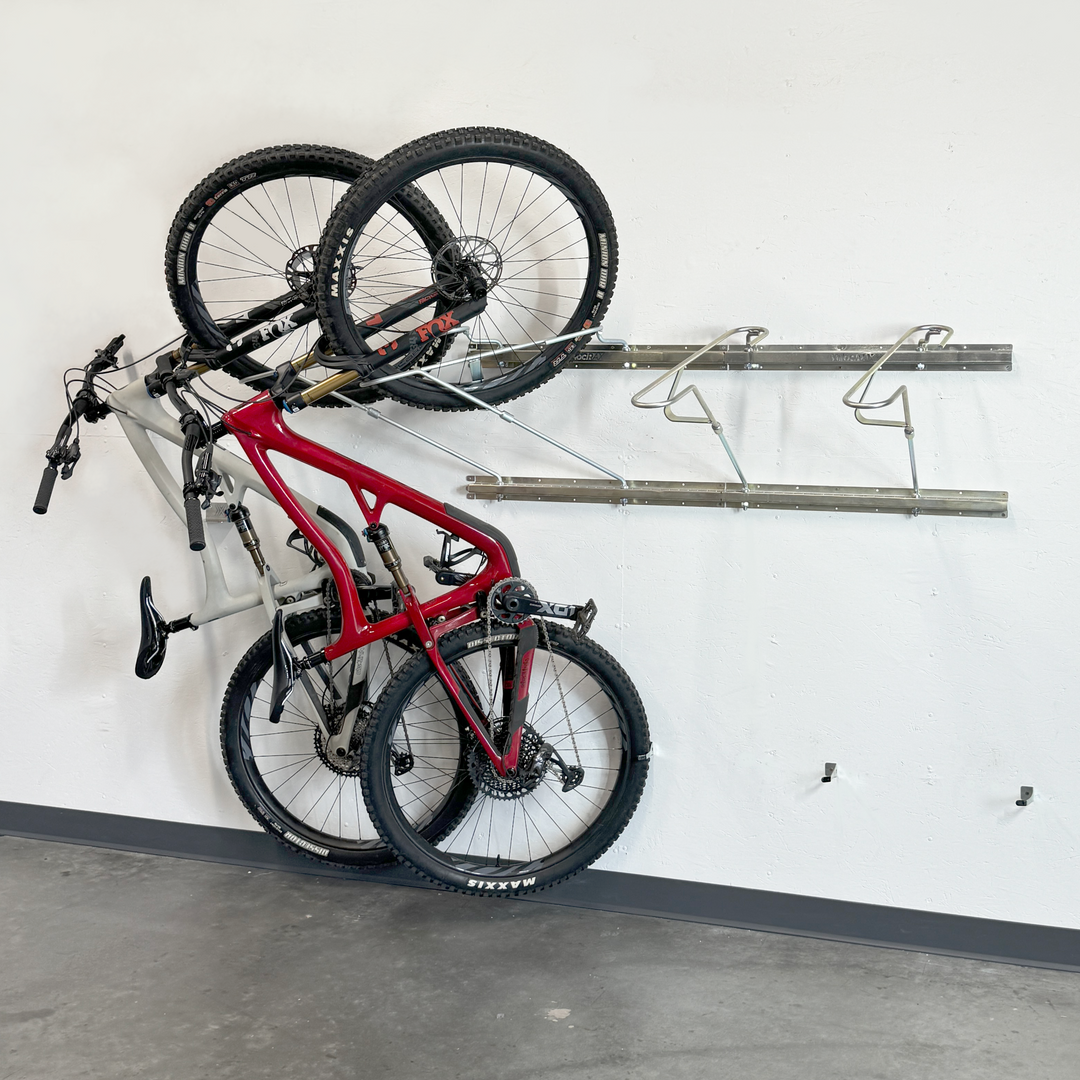
Installing Your Garage Mount to Convert Your MAX Rack into a Garage Bike Rack
Your rack is built. Now it’s time to install the garage bike rack mount, allowing your VelociRAX Max Rack to double as a garage bike rack when not on your vehicle. Twoofer. Plan on XX minutes for installation. Grab the bag with hooks and the mounting brackets wrapped in cardboard.
Tools Needed for the Garage Bike Rack Mount:
-
Cordless drill or screwdriver
-
Level
-
Measuring tape
-
Pencil or marker
-
Wall anchors (if installing on drywall)
-
Hammer (optional, for wall anchors)
1. Assemble the Garage Mount

-
Retrieve the long metal bracket and the small bag containing rubber hooks, washers, and nuts that were set aside during the VelociRAX MAX Rack assembly.
-
Open the bag with the rubber hooks and organize the contents in front of you.
-
Grab one washer, one nut, and one rubber hook.
-
Twist the nut onto the rubber hook until it reaches the rubber base.
-
Place one washer on top of the nut.
-
Remove the plastic covering from the mounting bracket. NOTE: There are four holes on each end.
-
Select the hole for your size of rack:
-
First hole (closest to bracket ends): 5 and 7 Rack
-
Second hole: 412 Rack
-
Third hole: 6 Rack
-
Fourth hole: 3x and 5x Rack
-
Insert the rubber hook into the selected hole, then add a washer and a nut. Tighten it by hand until fully secured.
-
Using a 16 mm wrench, tighten the nut to 16 ft lbs.
-
Repeat on the other side of the bracket using the corresponding hole.
-
Line up both rubber hooks so they are facing the same direction.
-
Hold each rubber hook in place and use a 16 mm wrench to tighten the nut until neither hook easily rotates.
-
Verify the assembly: The bracket should look complete, and it should hang perfectly off two of your tire baskets.
2. Determine Mount Location
-
Choose a sturdy wall in your garage with sufficient space for the rack and its contents.
-
Refer to the rack size widths and measure the width of your rack on the wall to ensure enough space for the mounting bracket and bikes:
-
Note that the mounting bracket is 44 and 3/4 inches long and must be secured onto two separate studs. Confirm your chosen area has two available studs.
-
Consider clearance: When fully installed, the rack with bikes typically extends about four feet from the wall (this may vary by bike size). Measure the distance beforehand to ensure no obstructions.
-
Once studs are identified and space is confirmed, measure up from the garage floor along one stud to determine the mounting height based on your selected mode.
3. Choose a Mounting Mode
There are three mounting modes to choose from based on your setup. Select one and mark the center of your stud at the corresponding height for the bottom of the bracket.
Standard Mode
Mount the bottom of the bracket at 56 and 1/4 inches from the ground. This requires rotating the hitch assembly to the opposite side before attaching it to the bracket. The tire baskets will angle downward for easier bike rolling in and out.
For bikes with a wheelbase longer than 46 inches, the back tire may touch the ground—if so, raise the basket 1 inch for every inch over 46 inches and place a wood block of equal added height under the center post for support.
Solo Mode
Mount the bottom of the bracket at 57 and 3/4 inches from the ground. The rack sits flush against the floor with no hitch assembly rotation needed. Baskets remain flat, so you may need to push the bike in with your knee.
Rack Roller Mini Mode
Requires the Rack Roller Mini accessory. Mount the bottom of the bracket at 61 1/2 inches from the ground. No hitch assembly rotation is required, baskets angle for easier roll-in/roll-out, and the higher height is ideal for larger frame bikes.
Watch the 3 Modes in Action to Help You Decide
This video shows the three different modes and their advantages and disadvantages.
Need a Rack Roller Mini? We got you. Buy a Rack Roller Mini here.
Related Link: New Product Alert: VelociRAX Rack Roller Mini
4. Mark Mounting Points
-
Use a level to draw straight, level lines to mark the positions for the mounting brackets.
-
Mark the drilling spots for the mounting brackets based on the support bar’s brackets.
5. Secure Mounting Brackets
-
Once the mode is selected and the height is marked on the first stud, grab the assembled mounting bracket and the included screws.
-
Hold the bracket so its bottom aligns with the mark on the first stud.
-
Insert one screw into the first stud.
-
Before securing the second screw, ensure the bracket is level by measuring the same height on the second stud or using a level across the top of the bracket.
-
Once level, screw into the second stud.
-
Add the remaining screws to secure the bracket fully.
-
Double-check that the brackets are straight and secure using the level.
6. Final Inspection
-
Tighten all hardware if needed.
-
Ensure the entire setup is secure, level, and able to support your storage needs.
7. Hanging Your VelociRAX MAX Rack on the Garage Bike Rack Mount
 The mounting bracket is now ready for use. Simply attach your hitch bike rack on the garage mounting bracket hooks in your preferred mode and start storing your bikes on your rack. Now you can enjoy a bike rack that can be us for safely transporting your bikes on the road or efficiently storing them in the garage.
Want year-round use of your VelociRAX MAX Rack? Check out our SkiRAX accessory to convert your rack into a ski/snowboard rack.
Related Link: Introducing SkiRAX: A Game-Changing Hitch Ski Rack for Your Car